Monday, March 31, 2014

A Tip on a Tute and a Tasty Thing

This week fellow Hands2Help-ers are invited to share a "tip, tute, and/or tasty thing" at Confessions of a Fabric Addict.  I can do that!

Since I discovered Pinterest last year, I've been adding all sorts of interesting tutorials to my Quilt Tutorials board.  One that I pinned recently has become the basis for this year's Hands2Help charity quilt.

It's called Dancing Pinwheels, a free block pattern I found over at Little Miss Shabby.

Well, I'm a sucker for pinwheels, not to mention colorful quilts that are scrap and stash friendly.  This seemed to hit all the marks.

The block called for 5-3/8 inch squares, cut on the diagonal to make your HSTs.  However, I wanted to use a charm pack I had on hand, so I adapted the block pattern to use 5-inch charm squares.

That meant that the setting triangles surrounding the pinwheel had to be a slightly different dimension as well.  Honestly, I just guessed at what those new dimensions might be—and it worked!  I cut 9-inch long rectangles from strips measuring 4.5 wide.  Then I cut those rectangles on the diagonal to make the setting triangles.

Here's another tip which came about through trial and error when I made a sample block.  When you sew the setting triangles to the pinwheel, you're going to want to have the broader, right-angle end of the triangle (not the skinny, pointy end) hanging over the edge of your pinwheel square by 1/4 inch.  That's in the upper right corner in the photo below.  You don't have to worry so much about where it hangs off on the opposite end of the seam.  It only took me having to rip out four seams before I got it right.  Just trying to save someone else the hassle and potential discouragement.

See below, where I've pinned that end in place, ready to sew it.  See how it overlaps the edge by a quarter inch?  You definitely want to use pins on this seam, too, because this is the bias edge of the setting triangle that you're sewing down and you don't want it to stretch.

The Dancing Pinwheels quilt has two blocks, an A block and a B block, which is the reverse of A.  You need to make 10 A blocks and 10 B blocks. That only became apparent to me as I started to sew the blocks.  

I am a visual person, so I scribbled what a B block looked like on the bottom of the page and believe me, I have referred to the drawings frequently!  Apparently, I'm easily confused.

The blocks, as modified for charm squares, end up to be 11-3/4 inches square (unfinished).


Now how about a treat?  Any gluten-free quilters out there?  I bet there are a few more than there were four years ago when I started blogging.  There is more awareness of celiac disease and gluten intolerance, and I suspect there are a lot more people recognizing that they feel better not eating gluten.

I made these gluten-free double chocolate cookies the other day.  It makes a small batch, just one cookie sheet full or about 12-15 cookies.  They stir up with a spoon in one bowl, and bake in 11 minutes, which means you can whip up a quick batch and get back to quilting with minimal interruption.

Here's the recipe:

Gluten-Free Double Chocolate Cookies

1-1/2 cups almond meal flour
2 Tablespoons cocoa
1/3 cup maple syrup (I substituted 1/3 c. granulated white sugar, as my syrup supply was running low)
1/4 teaspoon baking powder
1/4 teaspoon sea salt
Scant 1/4 teaspoon xanthan gum
1 Tablespoon vanilla extract
1/4 cup melted coconut oil OR ghee
1 egg
1/2 cup semi-sweet chocolate chips

Preheat oven to 350 degrees.  Mix everything together with a spoon in a small bowl until well combined.  Drop by rounded tablespoonfuls onto a parchment paper lined baking sheet.  Flatten slightly with the bottom of a glass (I put a piece of waxed paper between the glass bottom and the cookie dough so it doesn't stick when I'm flattening them).  Bake for 11 minutes.  Cool on cookie sheet 10 minutes.  Remove to rack to continue cooling.

Especially yummy while still slightly warm and gooey!


Tuesday, March 25, 2014

A Few Things

Here are the last three quilt-as-you-go blocks finished this week for the Soy Amado charity quilts.
 
These and my other orphan blocks have now been mailed off to Leila in Iowa, who will get them to Alison to be sewn together into quilts for street children in Mexico City.
 
There are some wonderful, colorful quilts resulting from this block drive.  You can check them out at Little Island Quilting.

* * * * *
We did a little thrift store shopping last weekend.  I found these Sigvard Bernadotte-designed china cups at St. Vinny's.

They are smallish in size, a little bigger than a demitasse but smaller than a standard coffee cup.  I think they may have been part of a hot chocolate set.

Love the modern, no-nonsense design and functionality.  They fit perfectly into the curve of your palm, great if you like to warm your hands the way I do.  I'm guessing they were produced in the 1970s maybe (?), by Johann Haviland, Bavaria, Germany.

* * * * *
Lately, I've been serenaded at night by a newcomer to the neighborhood.

Great Horned Owl (Image Source: Wikipedia)
"Hootie" perches in a tree just outside the house in the wee hours and starts making his presence known.  It's fun to imagine he's trying to deliver a message, like Hedwig in Harry Potter, but he's probably just establishing his territory.

If you believe in spirit animals, "When an owl shows up in your life, pay attention to the winds of change. Perhaps you are about to leave some old habits, a situation that no longer serves you or bring something new in your life."

I'm too much of a realist to put stock in such things, but it is interesting to ponder. The winds of change I'd really like to feel about now are the ones that blow in warm spring weather.

As owl calls go, his is fairly soft and soothing.  (You can hear samples HERE).  Although its repetitive nature means that about the time I nod off, he hoots another chorus.

It could be worse.  Just over the hill, about two blocks away, there was a barn owl last fall with the most blood-curdling scream.  (Samples HERE)  I would hear it in the evening just after dark as I took a walk.  I don't know how anyone living in the vicinity managed with all the ruckus.

But if they keep the population of furry critters down in my flower garden this summer, I'm good.  

Nature...gotta love it!

Friday, March 21, 2014

More QAYG Blocks

Got a few more orphan blocks quilted this week for the Soy Amado charity block drive.
These blocks date back to the beginning of this blog in 2010.  I was thinking of making a bento box quilt at the time, but it fizzled.  It's still on the bucket list, though.
It feels good to finish these up quilt-as-you-go style and send them off to where they'll be made into colorful quilts for those in need.

Again, just doing what seems natural when I sit down to quilt these.  I have always wanted to try wishbone quilting, but my attempts on paper have been pretty wonky.  Well, it came out just as wonky in the actual quilting too, but hey, that's why it's called practice.

Looks better from the back, perhaps.

* * * * *
Last Sunday afternoon, I had the pleasure of hearing the fabulous Jeni Baker of In Color Order talk about her quilts and her career as a pattern and fabric designer!

She spoke to a group of us at Mill House Quilts in Waunakee, Wisconsin, within easy driving distance for me, and the weather cooperated, thank goodness.

It was fun and fascinating to hear about her quilt making experiences and what sounded like a true Cinderella story when it came to her entry into the world of fabric design.
I loved seeing her trunk show.  So much wonderful color and pattern!
I was especially enamored of this one (below), an early quilt of hers replicated from a quilt her grandmother had made:

We even chatted a little bit before her talk, about Pyrex, her bunny George, and the joys of thrifting. 

Her new fabric line, due out in April, is an ode to her love of vintage linens, called Dreamin' Vintage.  I meant to tell her that her Lazy Daisy Raspberry reminds me very much of a bedspread and sheet set I had on my bed back in the day.
I probably got a little carried away by asking for a photo with her, but she happily obliged.  I am a giant by comparison to her petite frame, so I squatted down a good bit for this shot.  Work those quads!

Jeni was such a delight to hear speak.  Her energy and bubbly enthusiasm was infectious, and I left with a big smile on my face.  
And a little bit of fabric too!

Sunday, March 16, 2014

Giving Back

One of the many things I enjoy about making quilts is the opportunity to give them away and hopefully make life a little better for someone else.  That's why, for the fourth straight year, I am once again participating in the Hands2Help charity quilt challenge hosted by Sarah at Confessions of a Fabric Addict.

Confessions Of A Fabric Addict
This year there are three charities to choose from where you can donate a quilt:  Quilts of Compassion, Hurricane Sandy Survivors, and Happy Chemo.  You can read about the details and sign up HERE.

Sarah always makes it fun for participants, with linky parties, guest bloggers, and great prizes!  And there is plenty of time to make a quilt; you just need to mail it your charity of choice by June 13.

I hope you check it out!

* * * * *
I heard about another charity quilt effort last week.  "Soy Amado," headed up by Alison of Little Island Quilting, is making quilts for street children in Mexico City.  You don't have to make a whole quilt (unless you want to), just a 12.5-inch quilt-as-you-go (QAYG) block.

Orphan blocks are great for this.  I got started on my first batch by raiding my cache of orphan blocks and pieces.  I had quite a few kaleidoscope triangles left over, which conveniently made the right sized block, so I started with those.

Then I pulled out some sample blocks I made last year with "made fabric."

It's a great way to practice free-motion quilting.  Somehow, working with a 12.5-inch quilt sandwich and "doodling" with a quilting foot is a lot less intimidating to me than the idea of quilting a whole quilt.

With the pressure off, it's just 100% fun!  No marking, no advance planning, just lower the presser foot, step on the foot control, and see what happens.

Helping with the Soy Amado block drive is Leila, who is accepting QAYG blocks here in the U.S., plus $1 or $2 to help with postage, and will send them in batches to Alison, to be made into quilts for Mexico City street children.

They expect to be collecting blocks and making quilts for quite a while, so there is no immediate deadline. That means there's still time to join in, if you're so inclined.

* * * * *
Also, a reminder that Kevin is in the midst of his Quilt of Valor block drive.  I have about a dozen blocks ready to send to him so far.  It's already looking like it's going to be a big success!

Tuesday, March 11, 2014

Diamond Star Halo How-To

I am going to take a crack at describing how my Hubcap Diamond Star Halo quilt went together, for those who may be interested in making one.  This is not a detailed step-by-step tutorial, but I think you'll have all the information you need from here to create your own.

For starters, let's shorten the name of this to Diamond Star Halo, because that's what it basically looks like, at least to me—faceted like a diamond, the star in the center with the halo around it.  Your interpretation of hubcaps is optional.

The quilt is made with a 12.5-inch kaleidoscope block.  There are only nine blocks in the quilt, which measures 36 inches finished.  So it's wall hanging size or baby quilt size.

Below I have marked the lines which show the individual blocks.  See, only nine of them! 
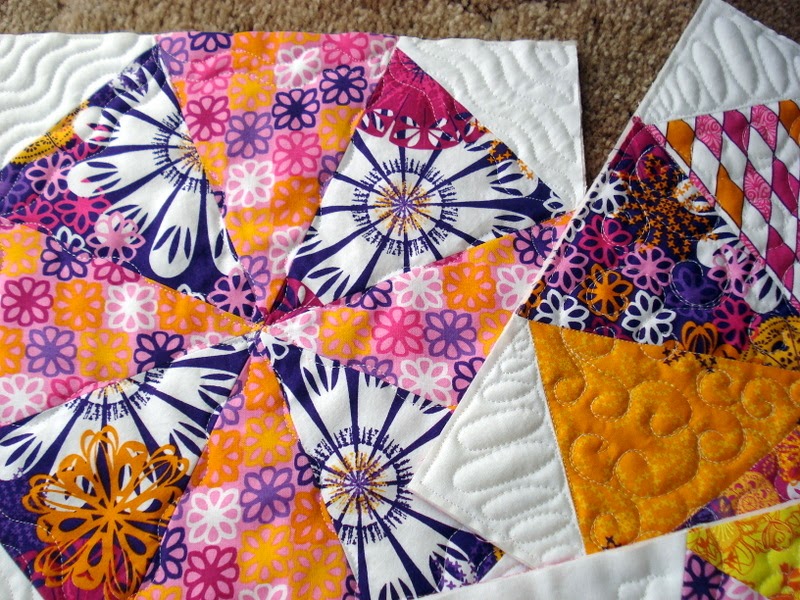
Each kaleidoscope block is made from eight wedge-shaped kaleidoscope triangle pieces and four 45-degree right triangles in the corners.  You can see the individual pieces better below, where I've marked all the seam lines to show the shapes.

So there are just two simple shapes that comprise each kaleidoscope block.  By using the white background fabric in the corners and parts of the four blocks at the compass points north, south, east, and west (the green and gold blocks above), you create the halo effect around a center star.

As you can see, value and placement of the various fabrics within the blocks is key to this quilt.  I've used mostly medium (or medium/dark) and light fabrics for contrast.  You're probably going to want to play a bit with the layout of your particular fabrics until it strikes your fancy.

I learned most of what I know about kaleidoscope quilts from the quilt along I participated in a couple years ago at Don't Call Me Betsy blog (which, sadly, no longer exists).  I used her PDF template for my kaleidoscope blocks for this quilt.  

Edited in March 2023:  The downloadable PDF template referred to in the preceding paragraph is, unfortunately, no longer available.  However, you can purchase a kaleidoscope ruler such as this one by Marti Michell (not an affiliate link), and use the appropriate markings on the ruler to cut your kaleidoscope triangle pieces for a 12-inch finished block.   

Original post continues:


You can then trace the shapes onto card stock to make your templates for cutting your fabric.  But what I did instead was tape the paper kaleidoscope triangle to the underside of one corner of my Companion Angle ruler that I already had, because the angle matched exactly.  You're going to be cutting your pieces from 6.5-inch strips of fabric, so the lower and upper edges of the kaleidoscope triangle template should match the width of the fabric strip exactly.  Zip-zip with your rotary cutter along the left and right sides and you're all set!

For the corner triangle pieces, instead of using the 45-degree template, I simply cut 4.5-inch squares from the background fabric and then cut them in half on the diagonal.  Easy-peasy, no template really necessary for those.

For my Diamond Star Halo quilt, I cut the following number of kaleidoscope (wedge-shaped) triangles:
8 white
4 purple
4 pink
4 med blue
4 blue floral
12 green
8 gold floral
8 light-colored dot
8 light floral
4 plaid
4 harlequin (center block)
4 purple floral (center block)

Plus:  36 white 45-degree triangles (cut 18 4.5-inch squares and subcut on diagonal)

That's 12 different fabrics, including the white/background.  A fat quarter of each would be ample, plus 1/2 yard (or less) of white.  Or use scraps.  Scraps are good!

Regarding assembly of the blocks, it may seem confusing but remember this:  The four blocks that are north-south-east-west are identical.  They're assembled exactly the same way and then the block is just turned the appropriate direction when you lay them out (before sewing the quilt top together).  

N-S-E-W blocks (make 4 identical)
Same idea with the four outer corner blocks.  They are all assembled the same way, the only difference being in the medium/dark fabric that forms the "X" shape in the block (i.e., one purple, one pink, one blue, and one blue print in my example).  The two light fabrics in these blocks are placed in the same positions in each block. For example, (see below) the light dot is at 6 and 9 o'clock, and the light floral is at 12 and 3.  Again, when you lay your blocks out for your final assembly, you'll just turn them.

Corner blocks (make 4 w/different fabrics in "X", same lights)
You only make one center block:

Center block (darker fabric forming "X")
Clear enough so far? 

As far as assembling the individual blocks, I like to lay the pieces out on the table the way they go together.  Then I start by sewing the corner triangles onto the four wedges that will make the "X" shape.

Please don't be confused by my example here.  I am using leftover, already cut pieces from my scraps, and the way I've laid them out here is not how any block in the Diamond Star Halo is pieced.  I'm just describing, in general, how to sew a kaleidoscope block together.

So, as I was saying, sew the corner pieces onto the four wedges.  They look like ice cream cones at this point, don't they?

I press all seams open through the whole block assembly process, and press after each seam is sewn.

Then starting from the upper left (ice cream cone piece) and moving clockwise, sew four wedges together.  Then repeat the same for the remaining four pieces, such that you end up with two halves or hemispheres.

Then sew the two halves together in one long seam, press, and there's your block!  Trim as necessary.  It should be 12.5 inches square.

Lay out your blocks as they're assembled and check to make sure everything is pointing the right direction, i.e., you see your star center and halo and such.  Then sew the blocks together in rows, etc., as usual to finish your quilt top.

Make sense?  If not or you have questions, let me know in the comments and I will clarify as best I can. 

If you make a Diamond Star Halo quilt, I'd love to see it!  I think it'd be cool to make it in Christmas prints or a nautical theme (or any number of other ways).  However you make it, have fun!

Sunday, March 9, 2014

Sunday Sundry 3-9-14

How do you fare with the Daylight Saving Time change?  Does it take you a bit to get acclimated or do you sail right through unfazed? 

It's nice to have the extra hour of daylight this evening, but my body was reluctant to get out of bed this morning until it was good and ready.  
...because it'll be over soon!
This afternoon I got really hungry around 4:00 p.m. and nixed exercising in favor of a walk to the kitchen.  Then I realized I hadn't changed the sewing room clocks yet and it was actually an hour later, so no wonder.  I'll catch up eventually.

I made this little mat because I needed to practice my quilting for the Hubcap Diamond Star Halo quilt. I had some random kaleidoscope triangles in the scrap box, so I put a block together and practiced FMQ. 

(Back)
In the end, I quilted the curves inside the triangles with a walking foot on the actual quilt (see previous post), and I'm glad that was possible because it worked out much more smoothly and evenly.  I didn't mind all the pivoting and turning because the quilt was on the small side so it was doable.

Someone asked if I would make a pattern for the Hubcap Diamond Star Halo quilt (hi Sarah!).  Yes, I will be happy to give you the skinny on how it goes together this week sometime.  It won't be a pattern per se, but I'll tell you how to make one should you be so inclined.  Sound like a plan?

Have you seen what Kevin is doing?  A Quilt of Valor block drive from now until June 1!

QOV Block Drive - Kevin the Quilter
He's got all the details on it HERE.  It's a simple block that anyone can do, and I hope you will!  I knocked out 10 of them on Friday night in a short amount of time.  It's a good scrap buster and a great cause!  And there will be a drawing for a $100 gift card, with one entry for every 5 blocks you send.

I did a little sewing on my Tea Towel Challenge project this weekend, mainly just sewing together what had been staring at me from the design board for a month.  Here's where it stands at the moment.  Sort of unsure what direction it will go next, but it'll come in time as I continue to putter.

I'm listening to the Mighty Oaks lately. Can't wait until the white stuff has melted and it looks like this summery scene again here!


Friday, March 7, 2014

Hubcap Diamond Star Halo

Well, you're built like a car
You've got a hubcap diamond star halo
You're built like a car, oh yeah...

That song lyric was the inspiration for this quilt.  More specifically, it happened like this, as I related in my original post when I started this quilt way back in February 2012:

See, it all started as my husband and I were driving one day when the '70s classic T. Rex song, "Bang a Gong" came on the radio.  There are some strange lyrics in that song.  I wondered what the "teeth of the Hydra" or a "cloak full of eagles" had to do with anything, but more importantly, what a "hubcap diamond star halo" would look like.  My imagination went into overdrive.

"I want to make a quilt and call it Hubcap Diamond Star Halo," I told Norm while the song played on.  Talk about working backwards.  The name came first.

I knew it would have to have elements of '70s psycha-funka-delic style, and I probably just made that word up.  I was envisioning those bold, bright colors like Peter Max and H.R. Pufnstuf cartoons, and glam rocker and T. Rex front man himself, the late Marc Bolan.

You can read the rest of that post and see the video I made of the creation process.  Frustrating as it seemed at the time, in retrospect it was really pretty fun.

I finished the flimsy days later.  Days, people.  And then a couple years went by.  Years!  To quote the final line of "Bang a Gong," which Marc Bolan apparently borrowed from Chuck Berry:
Well, meanwhile, I'm still thinking....

Yep, thinking for like two years about how to quilt it (while doing a good job not thinking about it as well, as in not focusing on getting it done). Taking a fresh look at it earlier this year, I decided I had learned a couple things in the interim and was ready to tackle this particular UFO.  And so I did.

Well, you're windy and wild
You've got the blues in your shoes and your stockings 
You're windy and wild, oh yeah...
I ended up quilting the gentle arcs in the triangular prints with a walking foot.  Then I free motion quilted swirls and pebbles (mostly swirls) in the white space.
The fabric is from a fat quarter stack/quilt kit I found a few years ago at the thrift store, new in the box, marketed by Jo-Ann Fabric at some point in the not-too-distant past.  The binding is Alexander Henry's Heath, from a scrap I'd been hoarding saving.  It measures 36 x 36 inches.
The back is funky purple, pink, and orange, oh my!

And with that, I say Bang a Gong!

(Edited to add:  I did a post about how to make this quilt, which you can find HERE.)


March Finishes